Automatic Data Ingestion in Snowflake Using Snowpipe
Snowflake is the new buzzword in the cloud world, which offers data-warehouse-as-a-service (probably DWAAS in the cloud lingo). If you would like to read more about its capabilities and use cases around it, take a look at their site here. FYI, they have built a new SQL Engine from scratch, and the whole platform runs on AWS infrastructure. It is a technological irony that Snowflake performs better (in my opinion) than Amazon Redshift in many ways.
That’s all about Snowflake intro!
This post is a simple tutorial on Snowpipe Service - the automatic data ingestion mechanism in Snowflake. In this example, we will load JSON data from an AWS S3 bucket. However, Snowpipe works seamlessly with other data formats like CSV, Parquet, XML, and cloud storage providers like azure blob storage, and GCS (AWS & JSON is only a choice for the tutorial).
Setting up a Snowpipe is a 6 step process.
- Set up s3 bucket and store or pipe the data to flow into the bucket
- Create the target Table to where the data should terminally go
- Create an External Stage that points to the data source (S3 bucket)
- Create the File Format for the data to be fetched
- Create the Snowpipe
- Configure S3 event notifications to notify Snowpipe when new data arrives
That’s all!
tldr;#
-- Create target Table
CREATE TABLE ADDRESSDB.MASTER.USERDB (
    CREATETIME TIMESTAMP,
    FIRSTNAME STRING,
    LASTNAME STRING,
    PHONENO STRING,
    EMAIL STRING,
    ADDRESS VARIANT
    );

-- Create External Stage
CREATE STAGE ADDRESSDB.MASTER.USERDB_STAGE     URL='s3://bukent_name/prefix/'
CREDENTIALS = (AWS_KEY_ID = AWS_SECRET_KEY = '')
COPY_OPTIONS = (ON_ERROR='SKIP_FILE' PURGE = FALSE);

-- Create File Format
CREATE FILE FORMAT USERDB_FORMAT
  type = 'JSON'
  COMPRESSION = AUTO
  STRIP_OUTER_ARRAY = TRUE;

-- Create Snowpipe
CREATE PIPE ADDRESSDB.MASTER.USERDB_PIPE
AUTO_INGEST = TRUE AS
COPY INTO ADDRESSDB.MASTER.USERDB
FROM (SELECT CURRENT_TIMESTAMP::TIMESTAMP_NTZ, $1:"firstname", $1:"lastname", $1:"phoneno", $1:"email", $1:"address" FROM @ADDRESSDB.MASTER.USERDB_STAGE)
FILE_FORMAT = ADDRESSDB.MASTER.USERDB_FORMAT
We will now go through them in a bit tad detail.
Step 1: Setup S3 Bucket#
Create an AWS S3 bucket. Take a note of the S3 bucket URL. Now create an IAM User with permission to access this bucket and generate an Access Key and Access Secret. Please follow the AWS S3 security best practices while creating the bucket, IAM User, and access keys.
Take a note of the following details once you are on this step.
Bucket URL: s3://<bucket_name>
Access Key: øøøøøøøøøøøøøøøø
Access Secret: øøøøøøøøøøøøøøøøø
Step 2: Create the target Table#
Login in to your Snowflake account, or to the SnowSQL prompt if you are a terminal person. Now create the target table to store the data. In this tutorial, as an example, I am going to store a simple user database in Snowflake. A sample JSON document is as in the below snippet.
[{
    "firstname": "Bruce",
    "lastname": "Wayne",
    "phoneno": "+12345678901",
    "email": "bruce.wayne@wayneenterprises.com",
    "address": {"street": "Mountain Drive", "doorno": 1007, "city": "Gotham"}
}]
The target table should essentially have these columns to effectively capture all of the data in our JSON document: FIRSTNAME, LASTNAME, PHONENO, EMAIL, and ADDRESS. The ADDRESS column will store a JSON object. Hence the data type of the field should be VARIANT. In addition to these, a CREATETIME column will record the time of insertion. The following SnowSQL command creates a table USERDB in the ADDRESSDB database under MASTER schema.
CREATE TABLE ADDRESSDB.MASTER.USERDB (
    CREATETIME TIMESTAMP,
    FIRSTNAME STRING,
    LASTNAME STRING,
    PHONENO STRING,
    EMAIL STRING,
    ADDRESS VARIANT
    );
Step 3: Create the External Stage#
We will now configure an external stage in Snowflake to let it know about our S3 bucket, and the access credentials to copy data from it. Spin up your SnowSQL prompt again (or on one of your Snowflake Worksheet) and run the below command.
CREATE STAGE ADDRESSDB.MASTER.USERDB_STAGE     URL='s3://bukent_name/prefix/'
CREDENTIALS = (AWS_KEY_ID = AWS_SECRET_KEY = '')
COPY_OPTIONS = (ON_ERROR='SKIP_FILE' PURGE = FALSE);
This command creates a stage called USERDB_STAGE that points to the S3 bucket buket_name. If you are storing your data with a specific S3 prefix you may add it to the URL (like s3://bucket_name/data/).
The credentials part configures the access credentials to read the data from S3 bucket. You may copy-paste the URL and access credentials if you have made a note of it in the first step. Please destroy the note after use and avoid unauthorized access.
The copy options specify additional configurations. The on_error option specifies the behavior on encountering an error in the data while loading. In the example, the copy options tell Snowflake to skip the file in case of errors. The purge option specifies whether the files are to be deleted from the external stage (the S3 bucket in this example) after loading. To see the complete list of COPY_OPTIONS please refer to the official documentation.
Step 4: Create the File Format#
We need to create a file format to specify the data format expected at the External Stage. This is done using the CREATE FILE FORMAT command.
CREATE FILE FORMAT USERDB_FORMAT
  type = 'JSON'
  COMPRESSION = AUTO
  STRIP_OUTER_ARRAY = TRUE;
Using this command we create a file format that can be used by a pipe later. The type parameter specifies that the expected format at the External Stage is JSON. The compression parameter is used to indicate the compression algorithm if the files on the External Stage are to be decompressed before reading. The strip-outer array parameter is used to strip the outer square brackets from the JSON document. This is a useful parameter and helps to load multiple JSON documents from a single file rather than loading file contents as a single JSON and later extracting the documents through SQL. Refer to the documentation for more details about File Formats.
Step 5: Create the Snowpipe#
In this step, we will create the Snowpipe specifying a file format for the data in the External Stage and defining the External Stage configurations and target to be used.
To create the Snowpipe, Snowflake provides the CREATE PIPE command.
CREATE PIPE ADDRESSDB.MASTER.USERDB_PIPE
AUTO_INGEST = TRUE AS
COPY INTO ADDRESSDB.MASTER.USERDB
FROM (SELECT CURRENT_TIMESTAMP::TIMESTAMP_NTZ, $1:"firstname", $1:"lastname", $1:"phoneno", $1:"email", $1:"address" FROM @ADDRESSDB.MASTER.USERDB_STAGE)
FILE_FORMAT = ADDRESSDB.MASTER.USERDB_FORMAT
Using this command, we ask Snowflake to create a Snow pipe named USERDB_PIPE and automatically ingest data using this pipe whenever new data is available in the External Stage. The SELECT query in the configuration transforms or picks the specific values in the JSON document to load it into the target table. In the command above CURRENT_TIMESTAMP::TIMESTAMP_NTZ inserts the current timestamp in UTC timezone. Then, all fields in the JSON document are inserted using Snowflake’s JSON querying syntax. Finally, we specify the file format as the USERDB_FORMAT we created in the previous step.
The pipe should be fully functional by now. You can test it by using the refresh query which will pick up any existing files in the S3 bucket and loads it into the USERDB table. The process may fail for JSON files if there are any errors or if there are any misconfigurations. Snowflake provides a few troubleshooting options in case of errors. I will write about it in the next post.
ALTER PIPE ADDRESSDB.MASTER.USERDB_PIPE REFRESH
- Configure S3 event notification
The final step is to create a mechanism to let Snowpipe know about the arrival of new data in the S3 bucket. Snowflake provides three options to do this. One is through a ReST endpoint run by the Snowpipe service that can receive notifications on new data arrival. This will require the Snowpipe service to always run the virtual warehouse to maintain the ReST endpoint. The next two options apply to AWS users. Similar solutions exist for GCP and Azure. The second method is to create an AWS SNS service to which Snowflake can subscribe for notifications. Another option is AWS SQS. We will look into this easier option in this example.
Once we create a Snow pipe, Snowflake creates an AWS SQS Queue for every configured Snowpipe. The ARN for the queue can be retrieved using the below command.
show pipes;
This command will show the details of all Snowpipes created under the current database and schema. Copy the value under the notification_channel column for the USERDB_PIPE we just created.

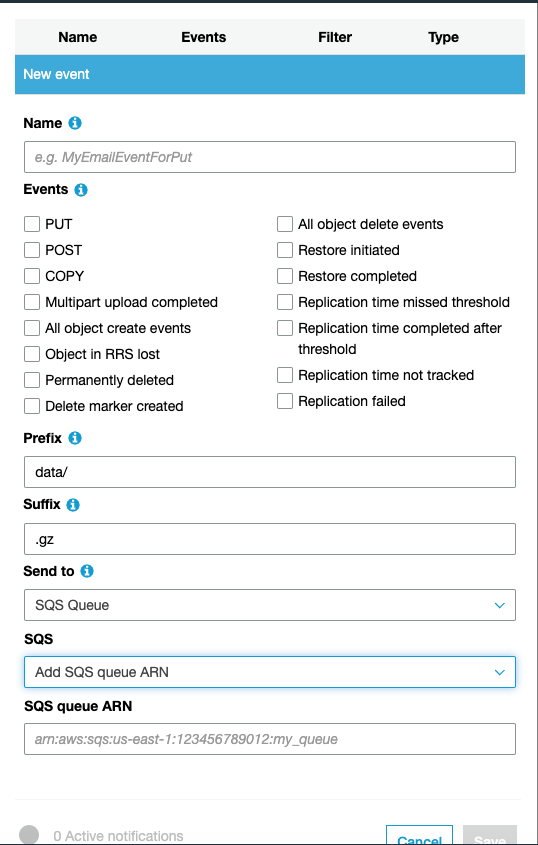
Now, login back to the S3 console and choose the source bucket’s properties. Choose Events > Add Notification.
Under the events section, check the ‘All Object creation events’ checkbox. Paste the notification_channel value in the SQS queue ARN field and Save.
Phew, You are done!
Whenever a new JSON document gets added to the S3 bucket, Snowflake loads it into the USERDB table automagically. You can test this by uploading a valid JSON file to the bucket.
In case of load failures, please refer to the troubleshooting documentation here. A quick debugging hack is to issue the copy into SQL manually and check for any SQL related or permission errors. An implicit assumption made in this post is that the Snowflake user has a role attached with appropriate permissions to create the Table, External Stage, File Format and Snow pipe.